
Introduction
The NextEvent PHP SDK is an easy-to-use tool to integrate the NextEvent ticket booking system into your own website or e-commerce platform. The SDK abstracts the interactions with NextEvent's RESTful APIs and facilitates authorization and request/response handing to the different services that build the NextEvent platform.
In order to use the SDK you need to sign-up for an organizer account and obtain the access credentials. Please contact us at nextevent.com.
Requirements
The PHP SDK runs on PHP 5.5 or higher and requires the Guzzle HTTP Client preferably installed via Composer.
Installation
Require the package using the composer CLI:
$ composer require nextevent/php-sdk
Add it to the
requiresection of yourcomposer.jsonfile:
{
  "require": {
    "nextevent/php-sdk": "~1.4.2"
  }
}
The SDK is best installed with Composer.
Service Overview
The NextEvent ticketing platform is a distributed system with multiple services involved. Although the SDK abstracts this for you and provides one unique interface to interact with them all, here's a general overview of the service architecture:
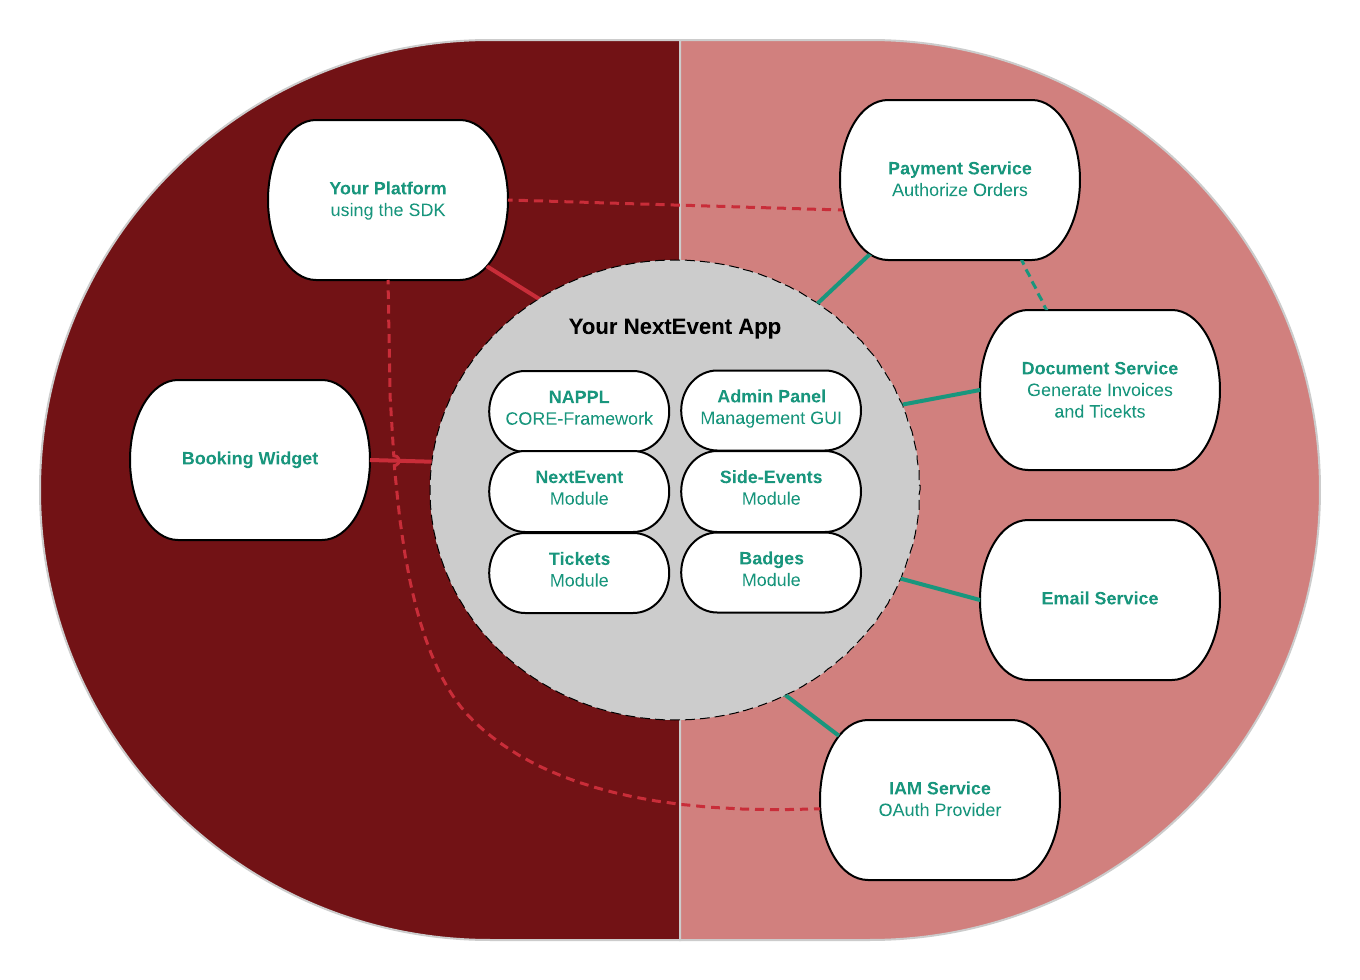
Your NextEvent App
Each customer runs its own individually tailored instance of the NextEvent app. That app
runs as a subdomain of nextevent.com like your-app-name.nextevent.com. The API is accessed
through that host name as well as the booking widgets are served from this domain.
Identity and Access Management Service (IAM)
This central services acts as an OAuth2 provider. It handles user and client (SDK) authentication and manages authorizations between the apps and services. The SDK primarily authenticates at IAM using Basic auth but SSL-certificate based authentication is possible too.
NextEvent Payment Service
Before orders can be completed and tickets are issued, the Payment Service has to authorize payment for a given order. It can handle credit card or invoice (bank) payments for you but also provides an API for external payment systems like your e-commerce application. During the order process, your system will obtain an authorization token for a given order and can confirm successful payment by settling that authorization at the NextEvent Payment Service.
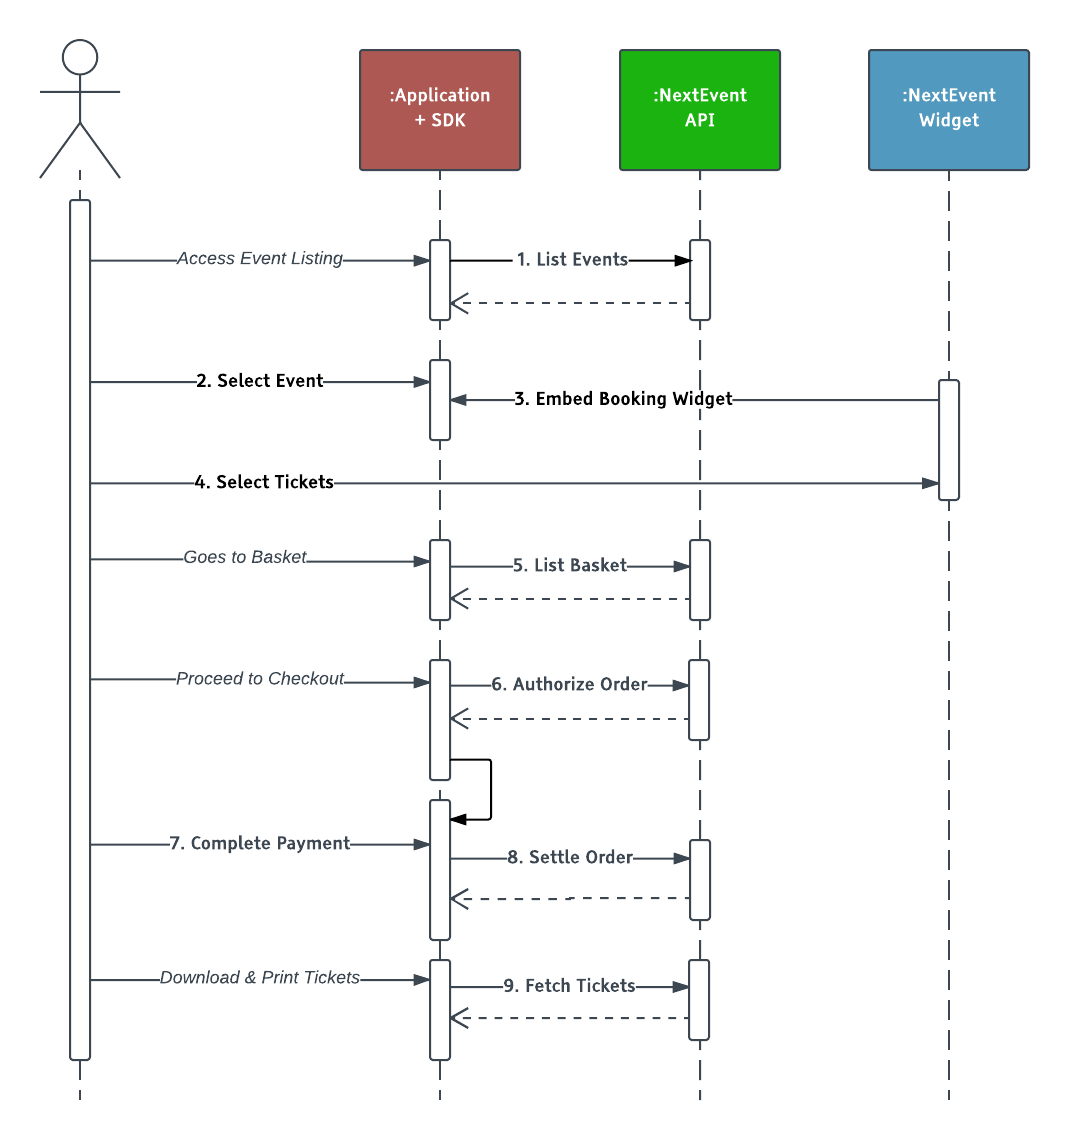
The Booking Process
Before starting to code, let's outline the order process and how your application interacts with NextEvent:
- API Get a list of events available for booking
- App Let the user select an event from that listing
- API Embed the NextEvent booking widget for the selected event
- Wdgt The user selects tickets in the booking widget
- API List the items from the NextEvent basket on your checkout page
- API Enter the payment process by getting an authorization code
- App Let the user complete payment on your platform
- API Confirm payment by settling the NextEvent order using the authorization code
- API Fetch the issued tickets as PDF document
Client Initialization
<?php
use NextEvent\PHPSDK\Client;

$options = [
  'appId' => 'your_nextevent_app_id',
  'appUrl' => 'https://your-app-hostname.nextevent.com/',
  'authUsername' => '<your-api-user-name>',
  'authPassword' => '<your-api-password>',
  'env' => 'PROD',
];
$nextevent = new Client($options);
In the following examples, we'll always use
$nexteventto refer to the client instance.
All access to the NextEvent API is handled by the SDK's Client class.
Therefore, the first thing to do is to create an instance of the NextEvent client
in your application.
To do so, the following information is required:
appId: the identifier of your NextEvent platform to connect withappUrl: the URL to your NextEvent platform instanceauthUsername: username used to authorize access the APIauthPassword: passwort for the API authenticationenv: (optional) which NextEvent environment to use ('INT' or 'PROD')timeoutHttpClient: (optional) Timeout in seconds for API requests (default is 10 seconds)
Please contact us to obtain these credentials for your NextEvent platform.
Setting the Environment
Set the locale to your website's language:
<?php
use NextEvent\PHPSDK\Util\Env;

Env::setVar('locale', 'de');
The SDK includes a class Env which is a static container for environment variables used by all components.
Use the setVar() method to change one of the following variables:
| Variable | Value | Default |
|---|---|---|
| locale | ISO 639-1 language code for event data and booking widget. Supported values are: 'de', 'fr', 'en' |
auto |
Event Management
Listing Events for Booking
<?php
$eventList = $nextevent->getEvents();
foreach ($eventList as $event) {
  $id = $event->getId();
  // present event title and details on your site.
  // use $id to reference the selected event for booking.
}
$eventis an object of typeEventwith getters for the individual properties.
The getEvents() method lists all events from your NextEvent platform which are currently available for booking.
Use this for listing events on your website, show details and initiate booking with the event's unique ID passed to the booking widget.
Get Event Details
<?php
$event = $nextevent->getEvent($_GET['id']);
// present event details on your page using getter methods of the $event object
$eventis an object of typeEventwith getters for the individual properties.
In order to display a fully detailed event page, data for a specific event can be fetched from the API by the unique event identifier from the listing.
Events can be filtered to get for example only actual or changed events since the last fetch. Please refer to the Querying section for more details.
Managing Events
The NextEvent platform offers a sophisticated admin panel for managing events with their versatile booking options like dates, categories, prices, discounts and restrictions. However, the SDK provides basic functionality to manage event data from within your application.
Using Model Classes
<?php
use NextEvent\PHPSDK\Model\Event;
use NextEvent\PHPSDK\Model\BaseCategory;
use NextEvent\PHPSDK\Model\BasePrice;
use NextEvent\PHPSDK\Model\Category;
use NextEvent\PHPSDK\Model\Price;
use NextEvent\PHPSDK\Model\Collection;
The relational data model used in NextEvent is represented with specific model classes in the SDK.
The base entity is Event where you can register a number of Categories and Prices.
Categories should be understood as a generic container for "a service" the customer buys a ticket for. This can be for example a priority seat at a specific date or a return ticket to the venue and back. Categories can also be used to limit the number of salable tickets.
Prices define the pricing options one can choose from after selecting a category. There's at least the default price for the service (category) and alternatives for reductions or surcharges. For example a reduced price for children or an early-bird discount.
Here's a little Entity Relationship Diagram to illustrate how these models are related:

Please note that Categories and Prices cannot be created directly but are solely managed
through BaseCategory and BasePrice models. While in simple cases each BaseCategory
relates to one Category, the base models can define rules for recurring events and additional
structuring attributes which will result in an entire matrix of combinations for the customers
to select from. Each of these combinations is finally represented by one Category item.
The same concept applies to BasePrice and Prices.
Create New Events
<?php
$myEvent = Event::spawn([
  'title' => 'My First Event',
  'description' => 'An event created via SDK',
]);

$nextevent->createEvent($myEvent);
$newEventId = $myEvent->getId();
First, spawn your new, non-persisted, event. It has to have at least a title and a description. Then persist it via the NextEvent Client instance.
This will update the event model with an identifier which can be stored in your application as a reference.
Managing Categories and Prices
Create New Categories and Prices
<?php
$baseCategory = BaseCategory::spawn([
  'title' => 'My New Category',
  'event_id' => $myEvent->getId(),
  'custom_attribute' => 'my-custom-attrib'
]);
Setup your categories by creating BaseCategories. Spawn a new, non-persisted base category first.
It has to have at least a title and a reference to an event, your previously created one in this case.
Custom attributes can also be persisted.
<?php
$basePrices = $baseCategory->getBasePrices();
$basePrices[] = BasePrice::spawn([
  'title' => 'Adults',
  'price' => 35.9,
  'currency' => 'CHF'
], $baseCategory);

// + add more pricing options like this
Every BaseCategory requires at least one BasePrice which shall be pushed to the base category's
collection of base prices. Use BasePrice::spawn() to create new, non-persisted base prices and
provide a BaseCategory as the second argument here.
<?php
$nextevent->createBaseCategory($baseCategory);
Finally, persist the new base category with its prices assigned using the createBaseCategory
method of the NextEvent Client instance.
This operation will now create all instances of Category and Price items based on the submitted base data.
Fetching Categories and Prices
<?php
$myCategories = $nextevent->getCategories(['event_id' => $newEventId]);
foreach ($myCategories as $category) {
  $prices = $nextevent->getPrices(['category_id' => $category->getId()]);
  print_r($prices);
}
After categories and prices have been successfully created, they can be fetched using the client's getCategories()
and getPrices() methods or getBaseCategories() and getBasePrices() respectively.
Updating Categories and Prices
<?php

$baseCategory = $nextevent->getBaseCategories(['base_category_id' => $myCategoryId])[0];
$baseCategory->setTitle('The other category');

// save updated categories
$nextevent->updateBaseCategory($baseCategory);
Once created, categories and prices can be updated via their parent BaseCategory and BasePrice models.
First, fetch the desired BaseCategory model from the Client.
Then update properties using the according setter methods. Finally, persist the changes using
the Client's updateBaseCategory() method.
<?php
$basePrice = $baseCategory->getBasePrices()[0];
$basePrice->setPrice(89.9)->setCurrency('USD');
$nextevent->updateBasePrice($basePrice);
Updating prices works similar. You can fetch them either via the Client instance or directly from a
previously fetched BaseCategory.
Request capacity and availability
Categories provide some methods to request the current capacities and available items.
While BaseCategory and Category provide a method getCapacity(), the Category model provides an additional method called getAvailableItems().
<?php
$myCategories = $nextevent->getCategories(['event_id' => $newEventId]);
foreach ($myCategories as $category) {
  print_r([
    $category->getAvailableItems(),
    $category->getCapacity()
  ]);
}
Make sure to not request or override the capacity at BaseCategory-level when using individual capacities per category or if you've linked a seatmap to your event. In these cases the real capacity-value is only reflected on Category-level and can be accessed as it is shown in the example.
Definining individual capacities for each Category is currently not supported via SDK.
Embed the Booking Widget
<?php
// get the event ID the user selected for booking
$parameters = ['eventId' => $_GET['event']];
// the widget hash is part of the SDK config you received with your credentials
$widgetHash = 'js7g62g562ffufuwgt3';
echo $nextevent->getWidget($widgetHash)->generateEmbedCode($parameters);
This returns a
<script>tag which shall be inserted into the HTML page at the position where the booking widget should occur. The script then places an<iframe>into that container.
Because ticket selection can vary depending on how events are configured in NextEvent (multiple dates, different tariffs, reductions, seat selection, etc.) integrators don't need to worry about the details but instead embed a widget which presents the booking interface to the user.
This is a simple as adding a <script> tag to the HTML page. That script tag can be obtained from
the NextEvent Client instance provided by the SDK.
Embedding Parmeters
| Name | Description | Default |
|---|---|---|
| eventId | The Event ID to book tickets for | -- |
| link | Direct path to load in the widget. Exclusive to the eventId parameter. |
-- |
| basket | A basket reference to assign the widget's session to. This is used for rebooking cases. | -- |
| width | The CSS-style width of the widget element | 100% |
| margin | Left and right margin distance (CSS value) | -- |
| focus | Whether to focus the widget if a redirect has been done. | true |
Include the Widget API Script
In the page where the booking widget is embedded, also include the script from the SDK:
<script src="/path/to/sdk/assets/js/widgetapi.js"></script>
<script>
NextEventWidgetAPI.addMessageHandler('basketUpdate', function(data) {
  console.log('basketUpdate', data);
});
</script>
The NextEvent Integration also requires some client-side JavaScript code to connect the booking widget with the server-side functions.
The SDK includes a script widgetapi.js which can be added to your website. It adds an
object NextEventWidgetAPI to the global window scope and connects your client-side code
with the embedded booking widget. The latter emits post messages
which are then processed and forwarded to handler functions registered on the NextEventWidgetAPI.
Emitted Messages
| Name | Description | Argument |
|---|---|---|
| basketUpdate | When a ticket was added to the basket or removed from it | {order_id: 12345} |
| currentStep | When the widget jumps to the next step | {step: 'checkout'} |
| closeWidget | When the booking process within the widget is finished and the host page should proceed | {} |
| timeout | When the NextEvent basket has expired | {} |
Subscribe to Widget Events
Register callback functions to post messages from the NextEvent widget:
NextEventWidgetAPI.addMessageHandler('basketUpdate', function(data) {
  if (data.order_id) {
    // store NextEvent's order ID in your user's session.
    // this ID is later used to complete the order via API.
  }
});

NextEventWidgetAPI.addMessageHandler('closeWidget', function() {
  // widget was closed -> redirect your user to the basket summary or checkout page
 });
In order to catch actions the user performs within the booking widget (iframe)
you should subscribe to the basketUpdate and the closeWidget messages
and act accordingly.
Have a look at the Integration Demo to see examples how to implement these handlers.
Proceed to Checkout
<?php
// retrieve the NextEvent order ID from your user's session
$orderId = $_SESSION['nexteventOrderId'];
$basket = $nextevent->getBasket($orderId);
Returns a
Basketobject with getters for the individual properties, including its items:
<?php
$totalPrice = 0;
foreach ($basket->getBasketItems() as $basketItem) {
  $category = $basketItem->getCategory();
  $price = $basketItem->getPrice();
  $totalPrice += $price->getPrice();

  $eventName = $category->getEventTitle();
  $description = $basketItem->getDescription();
  $priceFormatted = sprintf('%s %0.02f', $price->getCurrency(), $price->getPrice());

  // -> use $eventName, $description and $priceFormatted for your basket listing
  // -> optionally group items by $category->getId() or $category->getEventId()
  // -> get seat information with $basketItem->getSeat()
  // -> list all enclosed side event items with $basketItem->getChildren()
}
After the user has selected some tickets in the booking widget, NextEvent keeps them reserved
in a basket for a certain amount of time. The method getBasket() gives access to this
basket and the ticket items.
Basket Items with Seat Information
When booking seat-based events, the information about the selected seats is important and should
also be displayed on the checkout view. Grouping of basket items by category is not recommended
in this case. Check for seat-based tickets with $basketItem->hasSeat().
Basket Items with Child Elements
With the Sideevent feature enabled in your NextEvent app, users can choose additional options
or – as the name suggests – side events for a selected ticket. This selection is also represented
in the BasketItem
model and may be displayed on your application, too.
Basket Items with Editable Options
With certain modules enabled in your NextEvent app, individual basket items may offer options
to customize information like personalization data or additionally booked side events.
These options are listed as edit steps, each with a localized label and an url to open in
the booking widget. Use the BasketItem::getEditSteps() method and add a button to each item on
your custom checkout page. The edit step url is to be passed as link parameter
to the booking widget.
Have a look at the Integration Demo to see how the basket item listing could look like.
Remove Items from Basket
<?php
// retrieve the NextEvent order ID from your user's session
$orderId = $_SESSION['nexteventOrderId'];
$nextevent->deleteBasketItem($orderId, $_POST['itemId']);
From the listing of basket items on your checkou page, it may be desirable for the user to remove
individual items. Those operations can be forwarded to the NextEvent basket using the deleteBasketItem()
method.
Delete the Entire Basket
<?php
// retrieve the NextEvent order ID from your user's session
$orderId = $_SESSION['nexteventOrderId'];
$nextevent->deleteBasket($orderId);
There's also the use-case where a user wants to clear the entire basket or when the order process
times out du to inactivity. In this case, the deleteBasket() method will wipe the NextEvent basket
and releases the blocked tickets for sale again.
Extend Basket Expiration
<?php
// retrieve the NextEvent order ID from your user's session
$orderId = $_SESSION['nexteventOrderId'];
// set basket expiration to 10 minutes from now
$nextevent->updateBasketExpiration($orderId, 10);
In case the check with $basket->getExpires() shows that the NextEvent basket is about to expire soon,
the updateBasketExpiration($orderId, $expires) method will let you extend the expiration time to stay
in sync with your system's shopping session. The $expires argument either can be a positive integer
denoting the number of minutes from now or a DateTime object with an absolute date/time value.
Payment Process
The completion of a NextEvent order is an asynchronous three-step process:
- Your e-commerce system initializes the payment process
- The user completes payment through your system
- Your system settles the NextEvent order
Initiate Payment Process
<?php
// retrieve the NextEvent order ID from your user's session
$orderId = $_SESSION['nexteventOrderId'];
// enter payment process and extend the basket's time-to-live by 15 minutes
$payment = $nextevent->authorizeOrder($orderId, ['ttl' => 15]);
Returns a
Paymentobject which should be stored in the user's session for later settlement:
<?php
// store authorization invoice in session
$_SESSION['nexteventPaymentAuthorization'] = serialize($payment);

// fetch the final order items for listing on your invoice
$items = $nextevent->getOrder($orderId)->getOrderItems();
This returns an array of
OrderItems object which can be listed on your invoice for the customer.
When the user hits the checkout button on your website, NextEvent needs to lock the basket
and make sure the tickets are kept available for this particular order. To do so, use the
authorizeOrder() method. This will respond with an Payment object which holds authorization tokens
for later settlement.
Use the optional ttl option to advise the NextEvent system to grant at least N minutes for completing
the payment.
The Payment object also contains the total amount of the NextEvent ticket order which is to be charged
to the customer. We recommend to fetch the final basket items once again after the authorizeOrder() call.
Settle Payment
<?php
// retrieve the stored payment authorization from session
$payment = unserialize($_SESSION['nexteventPaymentAuthorization']);
// provide information about the customer
$customer = [
  'name' => "John Doe",
  'email' => "john.doe@example.com",
  // see complete list of fields on the left <-
];
// optionally, add your own unique payment transaction identifier for reference
$transactionId = 'YZX-5555-229';
try {
  $result = $nextevent->settlePayment($payment, $customer, $transactionId)) {
  // NextEvent has confirmed the order to be settled.
} catch (APIResponseException $e) {
  // the payment service could not settle the previously authorized payment.
  // -> cancel the checkout process in your system.
}
If successful,
$resultis a hash array with payment transaction information.
Once your e-commerce system has successfully authorized the user's payment and is ready to complete the order, it notifies the NextEvent Payment Service using the previously obtained payment authorization data.
The NextEvent API confirms the settlement or rejects with an API exception. If successful, the tickets have been finally booked for the supplied user and will be issued in an instance. This also means your system can now complete the order and redirect the user to a confirmation screen.
Customer Data
The $customer argument is a hash array with the following fields:
| Key | Type | Description | Required |
|---|---|---|---|
| name | String | The full name | yes |
| firstname | String | The given name | no |
| lastname | String | The familiy name | no |
| company | String | Company or organization name | no |
| String | Email address | yes | |
| address | Object | Hash array with address data | no |
Address Object
| Key | Type | Description | Required |
|---|---|---|---|
| street | String | Street name (with house number) | yes |
| pobox | String | P.O. box line | no |
| zip | String | Zip code | yes |
| city | String | City name | yes |
| country | String | ISO 3166-1 two-letter country code | yes |
Custom Form Fields
If your NextEvent app has a custom form
for billing addresses configured, any values for these addtional fields can be submitted with
the customer data object. Just use the field's "Name" setting as key in the $customer hash array.
Transaction Identifier
Since your system is in charge when it comes to money transfer, we recommend to provide
a unique identifer for the $transactionId argument when settling an order. This identifier will
be stored in our payment service as well and helps tracking payments.
Abort the Payment Process
<?php
// retrieve the stored payment authorization from session
$payment = unserialize($_SESSION['nexteventPaymentAuthorization']);
$nextevent->abortPayment($payment, 'User cancelled payment');
In case the user aborts the checkout or payment process on your system, the NextEvent app should be notified in order to unlock the basket for continuation or another payment attempt.
Retrieve Tickets
<?php
// retrieve the NextEvent order ID from your user's session
$orderId = $_SESSION['nexteventOrderId'];
$documents = $nextevent->getTicketDocuments($orderId, 10);
foreach ($documents as $document) {
  // get download url for this ticket document
  $url = $document->getDownloadUrl();
  // a) present this link to the user for direct download
  // b) fetch the PDF file with PHP or Curl and process this internally
}
After successful settlement, the tickets are issued and can be retrieved from NextEvent. Use the basket/order ID stored in your session to request the ticket documents.
The API will provide URLs where the tickets can be downloaded from as PDF documents. Usually the system issues one document containing all tickets but depending on the setup the grouping of tickets may vary.
It's now your application's decision how to present the tickets to the customer. The download URL is public and allows direct download but it's also possible to fetch them on the server and combine them with other documents from the order.
Entrance Check
The state of ongoing or closed entrance checks can be fetched and monitored via the NextEvent API. The SDK provides several methods to access entrance check data which we are going to explain here.
Access Model Classes
<?php
use NextEvent\PHPSDK\Model\Gate;
use NextEvent\PHPSDK\Model\Device;
use NextEvent\PHPSDK\Model\ScanLog;
use NextEvent\PHPSDK\Model\AccessCode;
use NextEvent\PHPSDK\Model\Collection;
All admission control data is wrapped with the following model classes for easy access and processing:
AccessCode: this is the base entity for entrance checks. Each ticket that is issued by the NextEvent
refers to an AccessCode which is identified by the barcode on the printed ticket. The code property
of an AccessCode essentially equals to the Ticket No. and is also encoded into the ticket's QR code.
Access codes, very much like the ticket they are connected with, always have relations to a Category
and a Price which define the actual service the ticket holder is eligible to consume and the
reduction that was granted. The latter may require additional verification at the entrance check
(e.g. checking a member card).
Gate: entry points to an event where tickets are scanned are registered as Gates.
Each gate refers to one or multiple Categories which are eligible to enter (or exit) at this point.
Scanning devices are then initialized with a QR code that was generated for a specific Gate.
Device: scanning devices used for entrance checks (i.e. mobile phones with the NextEvent app) register themselves at the NextEvent platform once initialized.
ScanLog: every incident where a device scans an access code (e.g. a ticket's QR code) is logged
with relations to Gate and Device. This includes the exact timestamp as well as the validation result
(i.e. OK or Rejected) which was displayed on the device.

Submitting Access Codes
<?php
use NextEvent\PHPSDK\Client;
use NextEvent\PHPSDK\Model\AccessCode;
use NextEvent\PHPSDK\Exception\APIResponseException;
use NextEvent\PHPSDK\Exception\InvalidModelDataException;

try {
  $accessCode = AccessCode::spawn(array(
  'code' => '123456789',
  'category_id' => 111,
  'price_id' => 222,
  ));

  $result = $nextevent->createAccessCode($accessCode);
  // Successfully created access code
} catch (InvalidModelDataException $e) {
  // data couldn't be validated
} catch (APIResponseException $e) {
  // the backend has rejected the submission
}
If access codes are managed in an external system rather than generating them in the ticket issuing process in NextEvent this can be done by using the Client::createAccessCode() method.
For each access code at least the following properties must be provided:
code: access code which is scanned at the entrance (should not include any special character)category_id: the category must correspond with the initialized category at the entranceprice_id: a price which is linked to the given category
Each new generated access code gets state: valid which allows a direct entrance.
Fetching Access Codes
<?php
$query = new Query();
$query->set('event_id', $eventId);
$categoryIds = $nextevent->getCategories($query)
                         ->map(function($category) { return $category->getId(); });
$query->clear()->set('category_id', $categoryIds);
$accessCodes = $nextevent->getAccessCodes($query);
$accessCodescontains a pagedAccessCodeCollectionwhich can be used like an array. Check the SDK Class Reference to see all getters of theAccessCodeclass.
Access codes registered on the NextEvent platform can be fetched with the Client's getAccessCodes() method.
Use the $query
argument to limit the results to a certain Category, Price and/or a single code.
If an AccessCode was processed (i.e. granted for entrance), it provides IDs of the Device and Gate of the
first processing.
Reading Scan Logs
<?php
$query = new Query();
$query->set('code', $accessCode->getCode());
$scanLogs = $nextevent->getScanLogs($query);
returns a
CollectionofScanLogitems in the order of their recording.
For a more detailed view on the entrance process of a certain ticket, the ScanLog history can be fetched
for a given AccessCode. In case an access code has been scanned multiple times, each attempt is represented
as an entry in the scan log. This is useful for analyzing discrepancies or tracking entry and exit actions.
Getting Gate and Device Data
<?php
$gate = $nextevent->getGate($accessCode->getGateId());
$device = $nextevent->getDevice($accessCode->getDeviceId());

printf(
  'Ticket %s was scanned with device %s at gate %s',
  $accessCode->getCode(),
  $device->getUUID(),
  $gate->getName()
);
AccessCode models provide getters for Gate and Device IDs.
The actual information about the referred device and gate configurations can be fetched using the Client's
getGate($id) and getDevice() methods.
An AccessCode can be scanned multiple times (e.g. when scanning entry, exit, entry, etc.).
The returned Gate and Device refers to the first positive entry scan.
If details of a subsequent scan are relevant they have to be fetched via ScanLogs.
Of course there are also methods available to fetch all gates and devices from the API: check getGates() and getDevices()
in the SDK Class Reference.
Both methods accept a $query argument and return a Collection containing the result set.
Device Login
<?php

use NextEvent\PHPSDK\Util\Query;
use NextEvent\PHPSDK\Util\Filter;
use NextEvent\PHPSDK\Model\Device;
use NextEvent\PHPSDK\Exception\APIResponseException;

try {
  $gate = $nextevent->getGate('<gate-id>');

  // Generate an sdk device or use existing
  $device = $nextevent->getOrCreateDevice();

  // Login device to gate
  $device->login($gate);

} catch (APIResponseException $e) {
  // Handle if the gate is invalid or not active anymore
}

// Somewhere else in your logout process
$device->logout();
The Device represents in the context of a Mobile App check the initialized Device.
By using the SDK for code invalidation you need a virtual Device which is logged in
so you can later on analyze which device has changed the entry state on the access code.
An instance of a Device has the ability to login at a given Gate.
The easiest way to get a Gate-ID is to extracted it from the initcodes detailpage in admin panel.
The device login can be done via the method Device::login(), which needs a previously fetched gate as an argument.
Your device information will be persisted on the API if the uuid of the device has not been stored yet.
If the gate is not active, the login will fail with an APIResponseException.
The device you use via the SDK will be automatically created based on your authUsername.
If you want to give your device another name, you can do so, by passing it as an argument to getOrCreateDevice.
You can also perform a logout with your device. Just call Device::logout().
Invalidating Access Codes
<?php
use NextEvent\PHPSDK\Util\Query;
use NextEvent\PHPSDK\Util\Filter;
use NextEvent\PHPSDK\Model\AccessCode;
use NextEvent\PHPSDK\Exception\APIResponseException;

> Login the device first

$query = new Query();
$query->addFilter(new Filter('code', '<code-to-fetch>', '='));
$codes = $nextevent->getAccessCodes($query);

try {
  // Invalidate all fetched codes (normally the query should match only one)
  $codes->setEntryState($device, AccessCode::ENTRY_IN);
} catch (APIResponseException $e) {
  // Handle it, 403 means a code could not be updated
}
The SDK allows you to set the entry state either of a single access code or a
collection of the access codes you fetched from the API.
You can either call AccessCode::setEntryState() or AccessCodeCollection::setEntryState().
Both methods need at least a logged in device as an argument.
An APIResponseException will be thrown with a message,
that your device is not logged in, if you haven't done it yet.
Importing Discount Codes
The SDK provides methods to import discount codes from an external system. This can be useful when running marketing campaigns or to issue discounts to members managed in your own CRM.
Prerequisites
The SDK is limited to import the actual discount codes but requires them to be linked with an existing discount group previously configured on the system. This discount group needs to be created first via the NextEvent admin panel. This is also the entity that is linked with the according categories and prices of an event where the defined discount shall be granted.
Discount Model Classes
<?php
use NextEvent\PHPSDK\Model\DiscountGroup;
use NextEvent\PHPSDK\Model\DiscountCode;
Discounts data is wrapped with the following model classes for easy access and processing:
DiscountGroup: this is the configurative entity defining the type and conditions of a discount. It needs to be created via the NextEvent admin panel first.
DiscountCode: the actual "code" a customer can enter in order to redeem a specific discount.
It is always linked to a DiscountGroup and maintains a validity state. If used with an order,
the DiscountCode model is also linked with the according OrderItem when fetching baskets and orders.
Fetching Discount Groups
<?php
$query = new Query();
$groups = $nextevent->getDiscountGroups($query);
$myGroup = $groups->filter(function($group) { return $group->getTitle() === 'Spring Promo'; })[0];
Returns a
CollectionofDiscountGroupmodels which can be iterated or filtered.
Before we can submit new discount codes to the system, we must first get a reference to an already
registered DiscountGroup.
Submitting Discount Codes
<?php
$newCode = DiscountCode::spawn([
  'code' => 'PROMO-' . strtoupper(date('yMdHis')),
  'valid_from' => new DateTime('today 06:00'),
  'valid_to' => new DateTime('now + 1 month'),
  'formdata' => [
    'firstname' => 'Samuel',
    'lastname' => 'Tester',
  ],
], $myGroup);
try {
  $result = $nextevent->createDiscountCode($newCode);
  printf('Successfully submitted %d discount codes', $result->count());
} catch (APIResponseException $e) {
  // the backend has rejected the submission due to invalid data or duplicate code.
}
New discount codes can be imported by first spawning a new DiscountCode model, linking it with a previously fetched DiscountGroup and submitting it to the API using the Client::createDiscountCode() method.
The actual code string must be provided and is the only mandatory field for creating discount codes. The backend will check it for uniqueness and respond with an exception if the same code already exists in the database.
When importing discounts for members or alike, additional formdata can be submitted with the discount code model.
This data will be used to pre-fill personalization forms during the order process when the according discount code is used.
Fetching Discount Codes
<?php
$query = new Query();
$query->set('augment', true);
$query->set('discount_group_id', $myGroup->getId());
$codes = $nextevent->getDiscountCodes($query);
foreach ($codes as $code) {
  printf('The code %s is %s and has been redeemed %d times' . PHP_EOL,
    $code->getCode(), $code->get('state'), $code->get('redeemed'));
}
Returns a
CollectionofDiscountCodemodels which can be iterated or filtered. Check the SDK Class Reference to see all getters of theDiscountCodeclass.
The SDK also provides a method to pull a list of existing discount codes for export or analysis.
When queried with the augment filter, the returned models contain extra properties like state and redeemed count.
Deleting Discount Codes
<?php
$query = new Query();
$query->set('search', 'PROMO-123467890');
$codes = $nextevent->getDiscountCodes($query);
if ($codes->count() > 0) {
  $success = $nextevent->deleteDiscountCode($codes[0]);
}
Any registered discount code can be deleted and thus voided for the booking process.
The Client::deleteDiscountCode($code) method requires either a DiscountCode model or a numeric ID
as the single argument. By performing a search query first, you'll get the right DiscountCode reference
to issue the delete command.
Backoffice Integration
<?php
$order = $nextevent->getOrder($orderId, ['tickets', 'document', 'items']);

// list all order items
foreach ($order->getOrderItems() as $orderItem) {
  // same model as in basket listing (see "Proceed to Checkout*)
}
// show ticket codes
foreach ($order->getTickets(true) as $ticket) {
  if ($this->hasDocument()) {
    // $ticket->getDocument()->getDownloadUrl()
  } else {
    // ticket may not yet been issued or has been revoked
  }
}
From the completed order process, you have stored the order ID in your application and have probably linked it with an order or payment transaction in your database.
In order to display details about a NextEvent order like a list of purchased items
or issued tickets, use that order ID to interact with the SDK. The client method
getOrder($orderId, $embed) will return all the data we provide related to the given order.
Use the $embed argument to specify what data you want to display in your application:
['tickets', 'document', 'invoice', 'items', 'user'].
Order States
An important property of the Order model fetched from the NextEvent API the return value
of $order->getState(). These are the possible states and what they mean:
| State | Description | Tickets Valid |
|---|---|---|
| reservation | Tickets have been reserved and the order is now waiting for payment (debitor) | no |
| completed | The order is completed and considered paid | yes |
| replaced | The order has been replaced (rebooked) | no |
| cancelled | The order has been cancelled and tickets have been revoked | no |
| payment | This is still a basket which is waiting for the payment process to complete | no |
Rebooking and Cancellation
Completed orders can be re-opened for changes or even be cancelled at all. Both operations can be initiated via the SDK and as a result, the already issued tickets will be revoked and invalidated for entrance checks.
Changes in Bookings
<?php
$basket = $client->rebookOrder($orderId);
// set rebooking order as current basket ...
$_SESSION['nexteventOrderId'] = $basket->getId();
// ... and store in session for embedding widget
$_SESSION['nexteventRebookingOrder'] = serialize($basket);
Now go to the checkout view to list and modify basket items.
In order to alter completed orders in NextEvent, one can create a replacement booking or in short rebooking. That's a new order which will replace the previous order once completed. Given the ID of a completed order, the rebooking process is started by cloning the completed order into a new basket. Despite the relation to the previous order, this basket doesn't differ from regular baskets and can be processed via SDK.
Use Booking Widget to add Tickets
<?php
// initialize the widget with event ID and rebooking basket reference
$basket = unserialize($_SESSION['nexteventRebookingOrder']);
$parameters = [
  'eventId' => $_GET['event'],
  'basket' => $basket,
];
echo $nextevent->getWidget($widgetHash)->generateEmbedCode($parameters);
New tickets can be added by embedding the booking widget with a reference to the rebooking basket. Therefore a basket reference is passed to widget embed code.
Completing Rebooking Orders
The rebooking process is completed by sending the basket through the payment process in the very same way as normal bookings. Depending on the changes to the rebooking basket, your customer needs to pay for additional tickets or gets money refunded if items were removed.
Since payment is handled individually in your shopping application, it's your responsibility to handle
additional payment or refunding. The SDK's Basket instance provides a helpful method $basket->getCancellationTotal()
returning the total amount of the previous order. Use this to compute the new amount to charge or refund
for the replacement order.
Cancellation of Orders
The cancellation of a NextEvent order is an asynchronous multi-step process:
- Send a cancellation request to get an authorization token
- Optionally prepare cancellation of other items it your application
- Settle cancellation using the previously obtained authorization
Requesting Cancellation
<?php
// get a cancellation authorization request and store it in session for later use
$cancellationRequest = $client->requestCancellation($orderId);
$_SESSION['nexteventCancellationRequest'] = serialize($cancellationRequest);
It's recommended to display a confirmation step before finally executing the cancellation.
The first step is to get an authorization object for cancelling a given order.
Use the requestCancellation() method which will respond with an CancellationRequest
object that holds an authorization token for later settlement.
Committing the Cancellation
<?php
$client->settleCancellation($cancellationRequest, $_POST['reason']);
unset($_SESSION['nexteventCancellationRequest']);
If
settleCancellation()doesn't throw an exception, the cancellation was successful and tickets from the referenced order are no longer valid.
After getting confirmation for executing the cancellation, use the stored CancellationRequest
to settle the cancellation via the NextEvent SDK. Letting the operator type in a reason phrase
why this order is being cancelled may help clarifying things later on.
Error Handling
Always wrap SDK method calls in
try/catchblocks and handle exceptions accordingly:
<?php
use NextEvent\PHPSDK\Exception\APIResponseException;

try {
  $events = $nextevent->getEvents();
} catch (APIResponseException $e) {
  trigger_error(strval($e), E_USER_WARNING);

  // display description to the user
  if ($e->getStatusCode() === 422) {
    echo "No events available: " . $e->getDescription();
  }
}
The SDK is a wrapper for NextEvent's RESTful API and as such errors can occur at various levels. For simplicity reasons, the examples shown in this documentation do not include error handling but that doesn't mean your code shouldn't do that either.
Generally, errors occuring within the SDK code are exposed as PHP exceptions thrown. If a method called from the SDK
completes, it's considered successful. Most of the Client's methods will throw an APIResponseException (or a derived exception)
which contain detailed information about the error. For logging and debugging purposes, the HTTP request/response
sent to and recevied from the NextEvent API can be retrieved with the getRequest() and getResponse() methods
of the exception object.
Error reponses from the API come with the according HTTP status codes like 403, 404 or 422. These errors also trigger
exceptions and their status code along with the error descroption returned by the NextEvent API can be read and alalysed using
the getStatusCode() and getDescription() methods.
When contacting our support, please always include the unique ID of a failing API request which is listed in the exception messages
and can be pulled with the getRequestID() method. This helps us tracking your requests and analyze the result on our side.
Advanced Usage
This section covers some optional features of the SDK for a more advanced integration in your PHP application.
Logging
Having meaningful logs is essential for monitoring a web application and tracking actions, success and failures as users interact with the system. While logging is entirely the reponsibility of the application integrating the NextEvent SDK, we provide utilities and best-practices to track the actions performed by the SDK.
Log Details from APIResponseException
<?php
use NextEvent\PHPSDK\Exception\APIResponseException;

try {
  // something
} catch (APIResponseException $e) {
  $logger->warning('NextEvent API error: ' . $e->getMessage(), $e->toLogContext());
}
Whenever the SDK throws a APIResponseException, the incident should be logged as there
was likely something working as expected. The APIResponseException class implements a number of getters
providing useful information for analyzing. A helpful one is toLogContext() which extracts metadata from
the failed API request and the received response. The full request/response payload can be obtained from
the dumpAsString($withStackTrace) method, optionally with the stacktrace appended.
Provide a Logger to the SDK
Implement your own logger following the
Psr\Log\LoggerInterface:
<?php
use Psr\Log\AbstractLogger;

class MyCustomLogger extends AbstractLogger
{
  public function log($level, $message, array $context = array()) {
    // your code here
  }
}
and pass it to the SDK's
Clientinstance:
<?php
$options['logger'] = new MyCustomLogger();
$nextevent = new Client($options);
The SDK components do also provide logs on various levels. In order to actually receive them,
the integrating application can inject a PSR-3 compatible logger
into the Client instance.
The PSR-3 Logger Interface describes a standardized interface for loggers. Many frameworks and standalone components already implement that interface and thus can be used with the SDK directly.
Caching
<?php
$cache = $nextevent->getCache();
if (!($events = $cache->get('Events'))) {
  $events = $nextevent->getEvents();
  $cache->set('Events', $events);
}
For the interaction with the NextEvent API it's useful to cache some information blocks on the application server in order to keep bandwidth and latency low. A good example for caching are the authorization tokens issued by the IAM service which are used to access the API and are valid for several hours.
The SDK comes with a simple file-based caching module which is used to store access tokens by default. You can use this
to cache more data like event details by obtaining the cache class from the Client instance.
Disable Caching
Initialize the client with the
MemoryStoreadapter:
<?php
use NextEvent\PHPSDK\Store\MemoryStore;
$options['cache'] = new MemoryStore();
$nextevent = new Client($options);
For development you might want to disable caching. This can be achived by initializing the client
instance with the MemoryStore adapter. This will store cache data only in memory and wipe it after the
PHP process terminates.
Custom Cache Adapter
Implement your own cache adapter:
<?php
use NextEvent\PHPSDK\Store\StoreInterface;

class CustomCacheAdapter implements StoreInterface
{
  public function set($key, $value) {
    // your code here
  }
  public function get($key) {
    // your code here
  }
  public function clear() {
    // your code here
  }
}
and pass it to the SDK's
Clientinstance:
<?php
$cache = new CustomCacheAdapter();
$options['cache'] = $cache;
$nextevent = new Client($options);
// or assign it after initialization
$nextevent->setCache($cache);
A more reasobale scenario is to use the caching infrastructure that is already used by you application, like Redis or Memcache which distributes accross multiple frontend nodes.
This is possible by providing your own cache adapter which simply implements the StoreInterface defined
by the NextEvent SDK. Now you can pass an instance of your own cache adapter to the Client object.
Querying
Data fetched from the API may contain information which you do not need for further work.
Therefore the SDK provides the class NextEvent\PHPSDK\Util\Query which is used to filter query results or set properties.
Basics
<?php
use NextEvent\PHPSDK\Util\Query;

$myQuery = new Query();
$myQuery->set('foo', 'bar');
$myQuery->setPageSize(10);

// the object methods are chainable so that this syntax will also work:
$myQuery = (new Query())
  ->set('foo', 'bar')
  ->setPage(2)
  ->setPageSize(10);
For using a Query instance, you initialize it via the constructor and call Query::set for each parameter you want to define. The class has setters for commonly used parameters like page and page_size.
To use the instance with the Client, you have to pass it as an argument to your request method.
Client
The following methods in the client accept a Query object as an argument:
- getEvents()
- getCategories()
- getPrices()
- getBaseCategories()
- getBasePrices()
- getOrders()
- getAccessCodes()
- getScanLogs()
- getGates()
- getDevices()
Supported parameters are documented in the SDK Class Reference.
Pages and PageSize
<?php
use NextEvent\PHPSDK\Util\Query;

$pagedQuery = new Query();
$pagedQuery->setPageSize(50);  // set page size from 25 to 50
$pagedQuery->setPage(10);  // fetch page 10
When fetching a collection you may want to get more (or less) items than the default 25. Or you wish to access a specific page of a collection.
For those purposes you can use the methods Query::setPage() and Query::setPageSize().
Both methods will only accept integers which are bigger than 0.
Trying to set an invalid argument will throw a NextEvent\PHPSDK\Exception\QueryException with the according message.
Filters
<?php
use NextEvent\PHPSDK\Util\Query;
use NextEvent\PHPSDK\Util\Filter;

$myQuery = new Query();

// Fetch all events which changed since 2018-10-24 09:00:00
$myQuery->addFilter(new Filter('changed', '2018-10-24 09:00:00', '>='));
$nextevent->getEvents($myQuery);
While the method Query::set() can be used for any type of parameters, Query::addFilter() exists for setting up filters
in the query.
The Filter class
can be used to create query parameters the API will understand to filter the resultset. For example you may want to
only fetch data which changed since the last poll.
The class constructor accepts three arguments:
- The filter criteria name
- The value to compare
- The comparison operator (optional, defaults to
'=')
Webhooks
Webhooks allow you to set up your app to notify other platforms about certain events. Possible events are the creation of a new category, an order cancellation and many more.
A webhook can be set up in the admin panel under System configuration.
Letting your platform fetch data in a certain interval is very inefficient because most of the time you will get data which did not change at all. This puts unnecessary load onto the app and your platform too. Therefore it is recommended to set up a webhook which points to a dedicated endpoint on your server. This endpoint will have to handle the payload correctly.
<?php
use NextEvent\PHPSDK\Model\Event;
use NextEvent\PHPSDK\Model\WebhookMessage;
use NextEvent\PHPSDK\Exception\InvalidModelDataException;
use NextEvent\PHPSDK\Exception\WebhookMessageException;

try {
  $json = WebhookMessage::current()->verify('<your-secret>')->getJSON();
  // Do something with the data...
  // Or
  $event = WebhookMessage::current()->verify('<your-secret>')->getModel(Event::class);
  // Do something with the event model...
} catch (WebhookMessageException $e) {
  // Handle verification error
  http_response_code(403);
  print $e->getMessage();
} catch (InvalidModelDataException $e) {
  // Handle wrong model error
  http_response_code(500);
  print $e->getMessage();
}
Usage
You have to use the WebhookMessage model.
It is recommended to instantiate it via the static method current.
This method creates an instance on the fly based on the incoming request information.
Otherwise you can create the instance via new.
In this case you have to make sure that you provide the headers and the payload to the constructor.
Verification
An instance of WebhookMessage provides a method called verify($secret) to
verify the incoming request on your server so you do not need to bother with signature checks.
The only thing you need to know is the secret which was used to generating the signature.
The secret has to be set via admin panel.
Handling Data
Usually you will receive json data in a webhook message.
Therefore you can use the method getJSON() on the instance to get an
associative array and handle it accordingly.
If you know which kind of data you received, you can also convert the data to
a model with the method getModel($className). This method will create a model
based on the payload and the headers.